Descendants - Making of
Information
Descendants is an animation short I worked at as Shading/Pipeline TD.
Although it aged a bit, there are still some tips and tricks you can use for your latest projects.
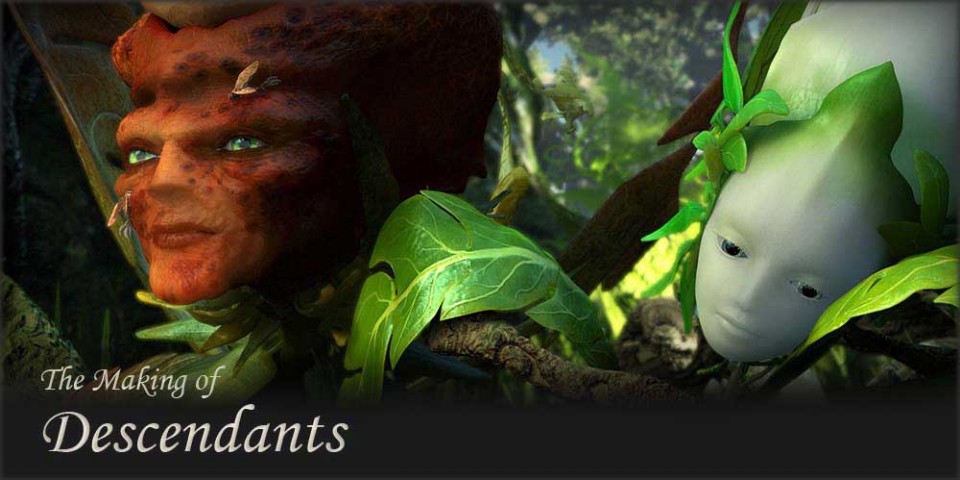
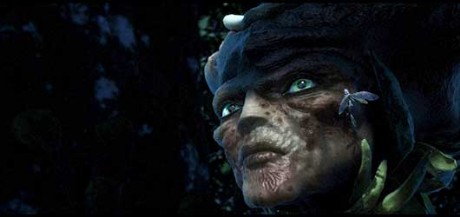
"Descendants" is a 14 minute animated short about the wish of attaining the unattainable and about the fact that something good can evolve from something evil.
The two main characters are flowers (voiced by Whoopi Goldberg and Christy Scott Cashman) who grow on the edge of a clearing next to one another.
One is old and jaded by a mysterious history - the other one still young, vivid and curious. Destiny has brought these two together and it seems as if they would exist without possibility for change, until one day a visitor to the clearing brings something unexpected to their lives.
This short film started as a diploma project by Heiko van der Scherm and Holger Schoenberger at the Institute of Animation (part of the Filmakademie Baden-Württemberg).
Preproduction, Story & Design:
In 2005 Heiko van der Scherm started working on the script. He invested months in the story structure, how to combine the many aspects of the story, how the multiple setups and payoffs could work.
If you like, you can read a whole article about the story development on his website www.vanderscherm.com: "Thoughts of the director"
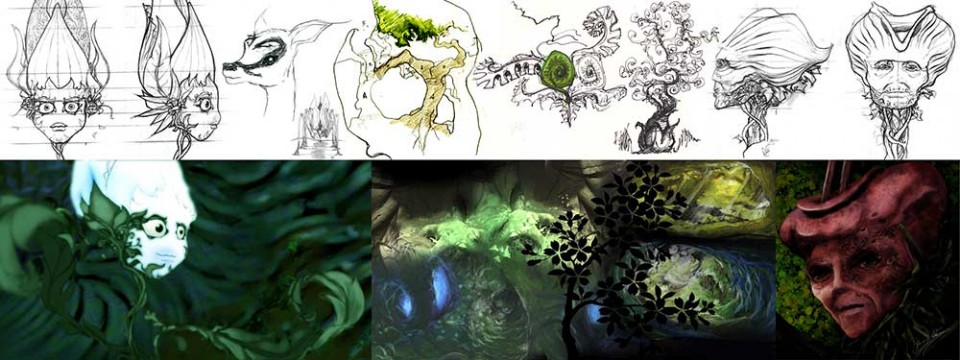
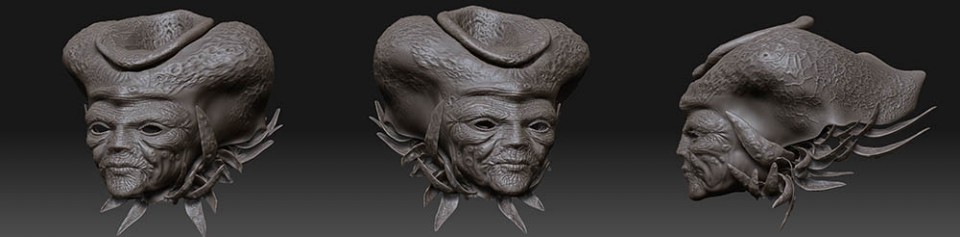
Heiko also worked as Production Designer along with Christian von Bock during that time. With the first drawings of the characters, Heiko started to model. But while he translated the 2D drawings into 3D models, he realized a problem: The impression of the personality of the character to the viewer was not kept. So he invested a lot of time evolving the final shape/look of the the characters directly in 3D trying to keep the nature/personality of the 2D drawings.
Holger Schoenberger, himself being responsible for all technical aspects, began shading in a staged scene. At the time of the Diploma they had the whole preproduction, script, animatic, models and renderings finished.
Let's get started with the production:
Holger and Heiko were confident about the story's potential, but during preproduction they were also aware of the many challenges that lay ahead; Eighty percent of the film was to be shot in the same location, with most of the story being driven by dialogue between two stationary main characters - a scenario typically avoided at all cost and scornfully referred to as "talking heads". And to make things more challenging still, they were extremely complex heads, talking in an extremely complex set.
Despite all of this, Heiko and Holger still managed to persuade the Institute of their short's potential and received the board's admission to continue the project.
Once green-lit, they started approaching future team members with all challenges in mind.
Heiko asked Bernhard Haux to join the team for the main character rigging - while soon after he found two animators who would be ideal for the subtle animation the short required: Goro Fujita (supervising animator) and Felix Graf. At that time they had just graduated from German Film School with their diploma topics being "Lip-Sync Animation" and "Believable Eye Animation".
One important aspect of the team was how the power of decision was handled. Usally in animation shorts you have one director who decides everything or you have multiple directors, who have to come to an agreement.
In this production different production parts have been split across the team members, the decision was handled by the person who is specialized in it.
For example Goro as animation supervisor had to get approval for the play of the characters from the director Heiko, same as a actor has to get approval for his play from an director. But the animation itself, how the animation was done was more his decision. So if Heiko animated for example some Insects, he was "degraded" to a simple animator who has to get approval from the animation supervisor Goro. Same for the look of the short. Although Heiko took a large part in developing the mood boards, colors and look of the short during preproduction, the final decision on shading and look was then Holgers department.
From Heikos article "Thoughts of the director": "Don't try to tell the animators how to animate. Start over and try to explain again the feeling of the scene, the goals and the mood, give easy examples, and stay away from comments about the animation timing,"
(Ok, this sometimes produced some struggles if e.g. the director likes his animation, how the play is seen by the viewer, but the animation supervisor rejects it because the animation lacks naturality of movement.)
Pipeline:
Because of the small team size and the project's distinct challenges, they needed to come up with a row of clever technical solutions.
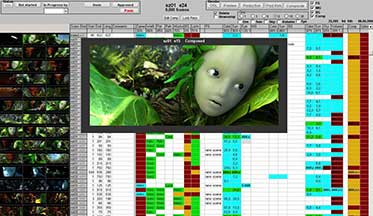
Usually student films at the Institute use an Excel document to organize the shot list but Holger had more in mind. Because the film had a very tough deadline, he did not only require a table tracking shot length, the person working on it and the approval status, he also wanted to be able to automate a lot of tasks, such as creating compositings, starting renders and executing scripts in multiple scenes.
As a result of these requirements, the 'ShotManager' was born - first planed to be open for any kind of project, but then customized for this project only.
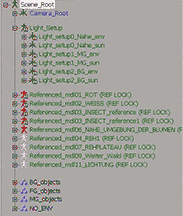
Since the whole film takes place at the edge of a clearing of a dark forest, the set had a fixed size. Splitting the set into about 6 multiple reference models has made it possible to set the scene layering inside of the scene manger (enable/disable what's required)
The Shot manager had also other nice features. If we had to make a change for all scenes (which happened a lot of times), we have just done it on one scene, copied the script log and put it into the Shot Manager. It then generated a script which opened every scene and made our changes. We let it run overnight and all scenes had been updated.
Because of the small team size and the project's distinct challenges, they needed to come up with a row of clever technical solutions.
Usually student films at the Institute use an Excel document to organize the shot list but Holger had more in mind. Because the film had a very tough deadline, he did not only require a table tracking shot length, the person working on it and the approval status, he also wanted to be able to automate a lot of tasks, such as creating compositings, starting renders and executing scripts in multiple scenes.
As a result of these requirements, the 'ShotManager' was born - first planed to be open for any kind of project, but then customized for this project only.
Since the whole film takes place at the edge of a clearing of a dark forest, the set had a fixed size. Splitting the set into about 6 multiple reference models has made it possible to set the scene layering inside of the scene manger (enable/disable what's required)
The Shot manager had also other nice features. If we had to make a change for all scenes (which happened a lot of times), we have just done it on one scene, copied the script log and put it into the Shot Manager. It then generated a script which opened every scene and made our changes. We let it run overnight and all scenes had been updated.
Staging:
Heiko did the modelling and staging, but after some test renders we realized that the set did not look good from certain camera angles. From some angles you could see the end of the set between the trunks, or the sky above the main characters who should stand in a deep forest. Holger and Heiko started to rearrange the trees but realized that every shot had to be checked to be sure that there were enough trees filling the empty spaces. However, adding too many trees and plants with their huge amount of detail would increase the scene size; and therefore memory usage and render time significantly. Another problem was that nature itself is a total chaos and by "imitating" it you tend to loose track of what is really used in final renderings (full or partly) Due to the amount of plants and trees, it was almost impossible to keep track of which and how many models were used in the scene. This posed an additional problem.
So Holger applied some random colored textures on the reference models, selected all scenes in the ShotManager and rendered the whole film. With low resolution models it took only a night. The color was random, but the texture was coded for each reference model (main stage, clearing, deer, back, right, left forest,...)

Main Character Rigging:
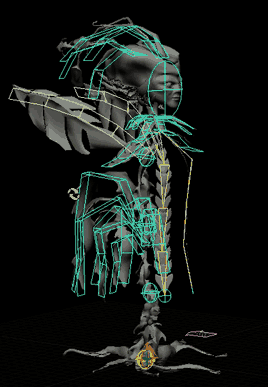
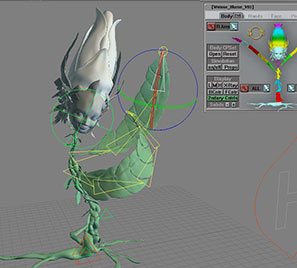
Because of the "talking heads" nature of the film, it was obvious that the faces needed to be believable and visually captivating. The articulation needed to be complex enough to support the refined animation the animators were aiming for.
Face and Body rigs were built from scratch - with the face rig being part of an evolution of rigs Bernhard developed on previous films. Jason Osipa's "Stop Staring" and Gary Faigin's "Facial Expressions" were sources of inspiration and starting points for the rigs Bernhard wanted to provide.
Instead of confronting the animators with a row of blendshapes, he consolidated the facial animation controls into a visual interface that resembled the face of the characters. In addition he offered the animators a couple automated controls to get lip collision as well as automated eye lid deformation to respond to the gaze direction and the bulged out shape of the cornea. Both were made automatic by choice and could be turned off by the animators, if desired.

But as often happens, the biggest problems come at you from the
sidelines. While the face required a lot of artistic attention, Bernhard
found the most time-consuming technical issue was an unexpectedly
complex Body Rig.
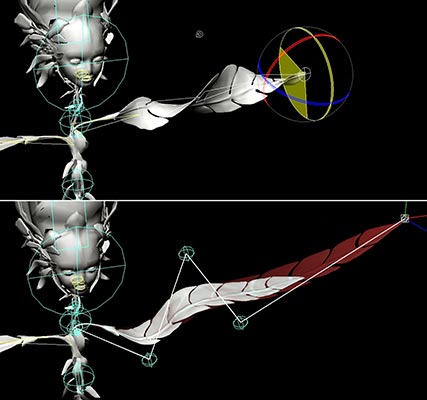
The characters had leaves for arms which would not only hold on to branches but also slide over them. It was soon obvious that a seamlessly blendable FK/IK Body and Arm Rig would be required.
The Leaves that were individually blendable between FK and IK controls would maintain their length - or stretch to match the positioning of the controls. FK controls were 'broken hierarchy' and could be detached from each other to handle individual constraints, such as to branches. The design of the older flower had no less than 20 leaves, each needing individual controls. Each leaf was long enough to require 3 to 5 joints - which turned out to be a somewhat interesting challenge for seamless FK/IK blending.
Whoever designs a character with 20 leaves has definitely anything but the work of a Character Rigger in mind.
At the time of production Softimage XSI 5.11 was the tool of choice - so
the speed improvements or ICE of more recent Versions were not yet
available.
The final rigs ended up needing to be so complex that they were fairly slow (8fps) in full resolution, so Bernhard created stand-in rigs, as well as a separate face rig that looked 100% identical to the character's heads - but would allow the animators to animate at least the face in real-time and without having to repeatedly create playblasts.
Goro and Felix would choose which leaves to animate by hand - and for the ones they did not want to bother animating, each leaf could be turned into 'simulation mode' into which they could blend seamlessly. This mode used XSI's Cloth engine to simulate the leaves' motion based on the primary motion of the flower's body. Unfortunately the simulation engine sometimes produced unstable results, which the animators would have to correct manually.
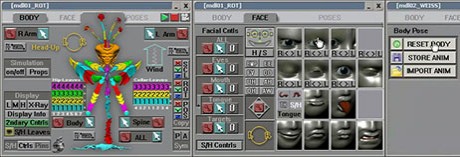
Obviously XSI's Synoptic View function was supremely used by our animators to trigger scripts that would facilitate the many tasks the animators had to face (precise object selection, keying, visibility, fast geometry caching for real-time playback, managing animation and poses, constraints and dealing with the many simulation parameters). Also we used custom 'Display Info' parameters to provide quick access to the options of each individual animation control.
The final rigs ended up needing to be so complex that they were fairly slow (8fps) in full resolution, so Bernhard created stand-in rigs, as well as a separate face rig that looked 100% identical to the character's heads - but would allow the animators to animate at least the face in real-time and without having to repeatedly create playblasts.
Goro and Felix would choose which leaves to animate by hand - and for the ones they did not want to bother animating, each leaf could be turned into 'simulation mode' into which they could blend seamlessly. This mode used XSI's Cloth engine to simulate the leaves' motion based on the primary motion of the flower's body. Unfortunately the simulation engine sometimes produced unstable results, which the animators would have to correct manually.
Obviously XSI's Synoptic View function was supremely used by our animators to trigger scripts that would facilitate the many tasks the animators had to face (precise object selection, keying, visibility, fast geometry caching for real-time playback, managing animation and poses, constraints and dealing with the many simulation parameters). Also we used custom 'Display Info' parameters to provide quick access to the options of each individual animation control.
Animation:
The Animation was challenging since the Characters weren't supposed to move around a lot, and the whole story had to be carried by their subtle acting. Felix and Goro were animating the main characters. Later in the production three external animators (Stephan Stoelting, Tobias von Burkersroda, Lucas Wendler) joined the team to assist with a couple of remaining shots and secondary characters.
Since many sequences were shot from similar angles, it was important to always keep track of the gestures and facial expressions used throughout the film to prevent repetitive actions. The animators payed close attention to the believability of the characters in every shot. The dialogue was recorded first and the acting had to match the tone and mood of the voices. The animators used mirrors to be able to act out each shot. No video reference was used.
In most cases the animators blocked-out animation by thumbnailing the shots on paper with simple drawings after carefully listening to the recordings. Then they would talk it through with Goro and start animating the shot in 3D. Since the main character rigs were heavy and slow, the animators used Bernhard's real time facial rig for the facial animation. Once the facial animation was done, the animators would copy and paste the animation from the real time rig to the main character rig. This workflow saved a lot of time and made it easy to make adjustments when shots had to be revised.
The little sub-leaves on the bodies of the main characters had a simulation switch which could be turned on after the animation process was done. Unfortunately in some cases the simulation didn't match the desired look and the animators ended up animating those leaves by hand.
Felix and Goro managed to match their animation styles to each others that it became nearly impossible to tell which shot was animated by which animator.
Texturing:
The textures of the characters have been hand-painted by Markus Schmidt (Insect + Red Flower Head), Stephan Stölting (Red Flower Body) and Goro Fujita (White Flower). There are seperate textures for color, specular mask, translucency mask, bump, displacement and the insect has additional textures for roughness, cavity and self-illumination.
For background+plant texturing Holger used procedurals and some scans of images. He also used his 3D_image shader, which creates a seamless 3D texture from a 2D image sample. To be able to apply the textures in the right grow direction, he created a special simulation to stretch the plants in their grow direction, applied a 3D projection to the stretched object and copied those UVWs back. Usally you edit UVs in the UV editor by moving the vertices. But as there is no 3D UVW editor, you have to move the vertices of the mesh itself in your viewport.
Shading & Lighting:
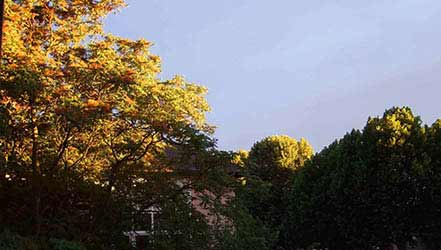
The original look was a very dark and mysterious wood with almost no light incidence. Some plants, like the white flower and some animals, where planned to have some fluorescent parts. Only the clearing should have been bright and sunny.
Holger searched for many jungle references and also used the movie "Apocalypse Now" as reference for lighting, particularly for its use of nice morning light as well as certain night shots in the jungle.
Since he typically worked from noon to midnight, he also had the opportunity to study many nice sunsets during the years of production.
The light setup was somehow difficult as the desired look that director Heiko van der Scherm requested did not allow any direct light on the main characters because the story is driven by the fact that the characters are in the shade of the trees all day long.
This basically meant that only indirect light could be used to illuminate the characters. Holger wanted to create a light-setup which could be used for the whole scene without having to alter it too much for individual shots. The first attempt was a multi-light rig or area lights from the clearing, but the scene wouldn't render in any reasonable amount of time because of the amount of geometry in the large main stage.
Final Gathering in XSI 5.11 was not an option since Holger assumed that there would be flickering problems due to the tiny size of the characters (a flower detail) in comparison to the large illumination area (a forest with big trees).
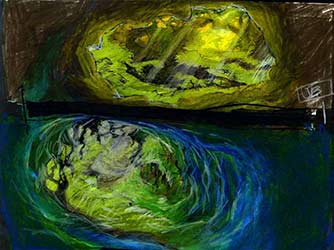
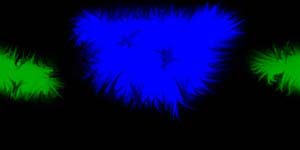
He ended up using the environment lookup from his Ambient Occlusion shader. Since he needed to render Ambient Occlusion anyway, it was only a tiny render time increase to get the base lighting in the scene. (While ambient Occlusion is calculated, all occlusion rays that are not blocked collect the color of an environment sphere) Holger painted a color-coded environment texture for lighting: Blue was the light from behind, green from the front.
For the final touch a small area light to brighten up the characters faces.

On the side you can see an environment texture. Thanks to the pipeline
structure Holger was able to change the lighting of the scene by just
re-painting the image. The render script took the right image per film
scene or, if existing, a unique texture per shot. No need to open and
resave the scene for the main lighting (Except for the small area-light
for the faces and characters, which had to be adjusted for each shot)
Holger sought advice about lighting from DOP, Bianca Bodmer, who he knew from taking camera classes. (Holger had assisted her in the lighting department and as As a 16mm loader on many productions and now she finally used the opportunity to repay the favor) As Holger had experience being on a real set, they were able to speak with the same terminology. Their conversations sounded somewhat alien to anyone not too familiar. "A Kinoflo horizontally here, a 3x3 Butterfly Frame from behind, a 4 kilowatt - flooded - as background rim" etc. Then the "on set lighting" was translated into CG lights.
Since there was a lot of work that had to get done in a short time, it was hard to keep an eye on everything without losing track of the details. It was important to have somebody who was able to offer a "fresh eye" on the work. Bianca suggested things like placing the area-light one meter higher in the scene or that the rim light should be stronger in certain scenes etc.
Rendering:
The artists used viewport capturing to check their animation, but they were also able to start an "OGL" rendering via the ShotManager once they thought the animation was right. This would give them the opportunity to see shot textured and referenced into the final edit.
The OGL rendering was just a single pass, three automated directional lights (key, fill, rim), high-res geometry, all backgrounds and objects included.
As it uses the same pipeline/render script as the final rendering, the team was able to spot problems prior to final (looong-time) rendering such as
- constraint flipping on a few broken machines
- simulation problems
- staging problems
- intersections with object hidded in animation scenes
- intersections with high-res geometry
The cut in Adobe Premiere was always updated with the latest version of
each shot, no matter if it was the OGL rendering, a low-res composited
preview render or the final high-settings production render.
The ShotManager made it possible to choose which pass, which scene layer and in which frame step to render.
For example, when Holger had changed the lighting or shading, he selected all affected shots and rendered every 36th frame in high-res to check for the effect. (Every frame was not required as the animation was already checked with the "OGL" rendering)
In the end, rendering was the bottleneck of the production, as usual. Animation was done, shading and lighting were done except for some shots that needed specific set-ups. It "just" had to render.
And as usual on a big production you always hit bugs in the render engine and limits of the machines (32bit at that time). There was for example one huge issue: Some shots suddenly had a frame render time up to or more than 24h (if the renderer even decided to finish the frame). The usual time was less than an hour and all scenes had been setup with the same models and lights, so f... why?. After we found the reason and a workaround for the bug, the rendertime was back 15 min. This issue took months to discover and delayed the production massively.
Render Passes:
We had 21 passes for the main shading plus some extra passes for volume-lights or sky. Grayscale mask passes were combined into RGBA image files to save hard drive space.
Instead of using a lot of scene layers to split the characters into separate layers (XSI passes), Holger decided to use masks in compositing for fine-tuning. This way he did not have the typical problems like "when rendering Object A, object B is required because of the Ambient Occlusion and Object C is needed as it casts shadows on A. At last Object D as mask as it is partially in front of A, but also behind..."
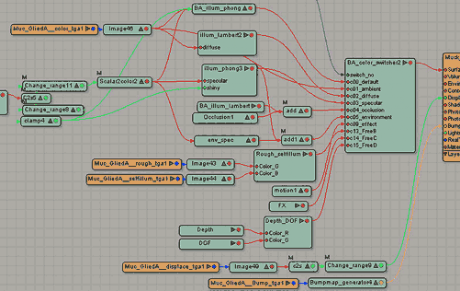
For the render tree setup Holger used the BA_color_switcher for every object. So he was able to adjust the shading of each object for each pass in one single tree.
Usually Shading TDs do not set up shaders you require for all objects (e.g. ambient occlusion or depth) separately for each object directly in one single render tree, since it is possible to override a whole pass with an ambient occclusion material.
In contrast to this classic approach, Holger took advantage of his unconvential idea of using the BA_color_switcher in a single render tree to receive his passes.
We had 21 passes for the main shading plus some extra passes for volume-lights or sky. Grayscale mask passes were combined into RGBA image files to save hard drive space.
Instead of using a lot of scene layers to split the characters into separate layers (XSI passes), Holger decided to use masks in compositing for fine-tuning. This way he did not have the typical problems like "when rendering Object A, object B is required because of the Ambient Occlusion and Object C is needed as it casts shadows on A. At last Object D as mask as it is partially in front of A, but also behind..."
For the render tree setup Holger used the BA_color_switcher for every object. So he was able to adjust the shading of each object for each pass in one single tree.
Usually Shading TDs do not set up shaders you require for all objects (e.g. ambient occlusion or depth) separately for each object directly in one single render tree, since it is possible to override a whole pass with an ambient occclusion material.
In contrast to this classic approach, Holger took advantage of his unconvential idea of using the BA_color_switcher in a single render tree to receive his passes.
With this method he was able to adjust the shaders per object and thus
able to adjust the ambient occlusion strength individually if necessary -
and was able to keep bump, displacement and -most importantly - the
transparencies and reflections.
Compositing:
Illumination and color was separated for two reasons; at first it was required in pre-production to get a special soft look (which was later rejected for the production)
and secondly also for production time. Holger was able to adjust the intensity and light color in compositing.
As it was not 3D, he was able to adjust and check the intensity and color of the light within 5 seconds on a still frame.
Again, the short production time-frame restricted the fine-tuning of lighting in 3D. It was all about keeping the render farm busy and getting the renders out as fast as possible. After a first deadline - a final rendered film was sent out to Cannes and Annecy - Holger got two more months to look into the lighting. For example he realized that the morning shots did not have enough contrast. So he applied new settings to the base lighting nodes in three different morning compositions. After he was satisfied, he applied a search and replace on all morning comps for the new settings via the ShotManger, and got a re-lit final-render for all morning shots (5000 HD frames) in two days. Re-rendering them in 3D would have taken much more time....
Final Words:
Descendants has been screened on 36 festivals so far, including some of the most important ones like Telluride, the LA Shorts or the Tokio Anime fair which is attended by 130.000 people every year. The film has won 12 international awards so far. Amongst others the "Animago Award for the Best Character", the "Grand Prize of the Tokyo Anime Award" or the "Pulcinella Award for the Best European Production."
Descendants has been screened on 36 festivals so far, including some of the most important ones like Telluride, the LA Shorts or the Tokio Anime fair which is attended by 130.000 people every year. The film has won 12 international awards so far. Amongst others the "Animago Award for the Best Character", the "Grand Prize of the Tokyo Anime Award" or the "Pulcinella Award for the Best European Production."
When the team started this project, each of the members underestimated
the length and scale of the production (way underestimated...!). Sadly
student short film projects like these often never get to see the silver
screen - but in the case of "Descendants" a very lucky combination of
having the right ideas, meeting the right people, combined with a good
vibe and a lot of personal dedication made this short film possible -
and even a lot of fun.